Checklists
Checklists are inspection templates that define what drivers and field personnel need to verify during vehicle inspections. As an administrator or manager, you create checklists with specific zones, items, and requirements, then assign them to vehicles or groups. When drivers conduct inspections, they follow these checklists to ensure compliance and safety.
💡 Who is this for? This guide is for administrators and managers who create and manage inspection checklists. If you're a driver looking to conduct inspections, see Inspections.
- Overview
- Checklist Types
- Create a Checklist
- The Checklist Builder
- Item Types
- Configure Failure Settings
- Checklist Settings
- Assign a Checklist
- Schedule Inspections
- Notifications
- Security & Permissions
Overview
ToolWorks checklists support Digital Vehicle Inspection Reports (DVIR) and other compliance workflows. Each checklist defines:
- Sections — Logical groupings like vehicle information, inspection zones, asset verification, and sign-off
- Zones — Areas of the vehicle to inspect (e.g., Driver Side, Front, Cab Interior, Engine)
- Items — Individual inspection points within each zone (e.g., Front Tire, Headlights, Oil Level)
- Failure handling — What happens when an item fails, including severity levels and required documentation
Once created, checklists are assigned to vehicles and can be scheduled to repeat at defined intervals.
Checklist Types
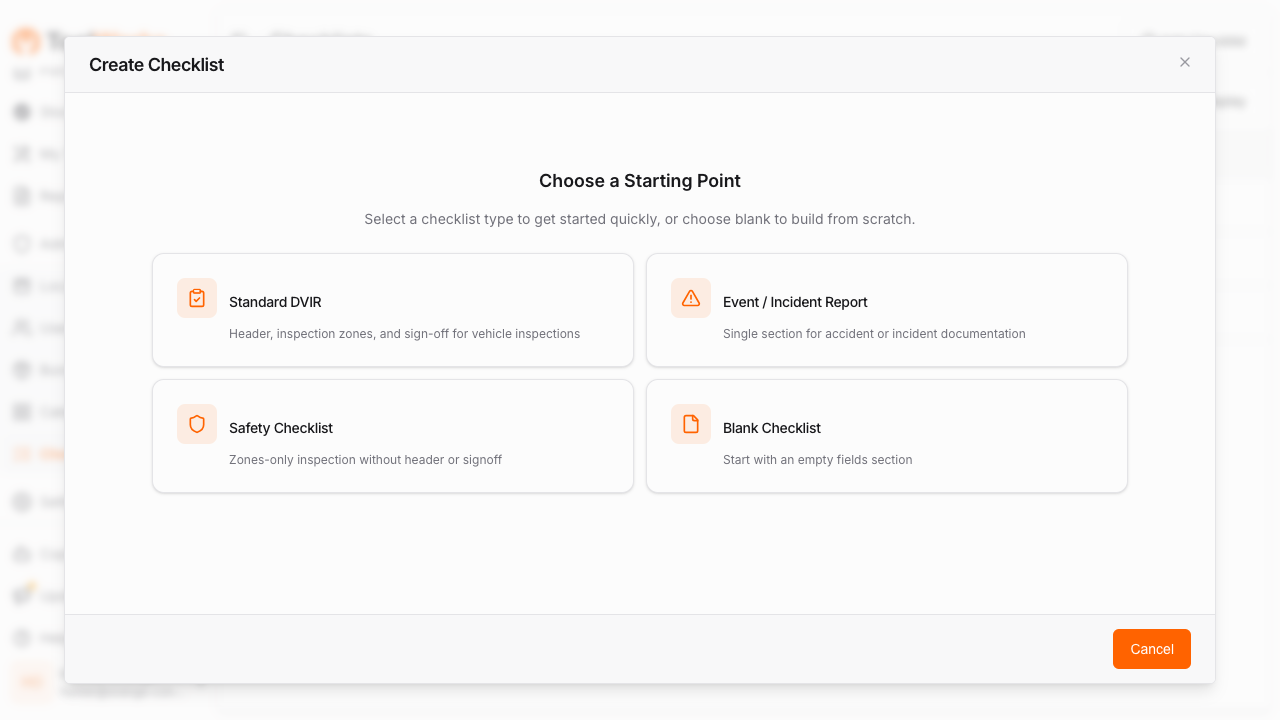
When creating a new checklist, you can start from one of four pre-built types:
| Type | Description | Best For |
|---|---|---|
| Standard DVIR | Complete pre/post-trip inspection with header info, inspection zones, asset verification, and driver sign-off | Daily driver vehicle inspections |
| Event / Incident Report | Incident documentation with date/time, photos, notes, and drivability assessment | Accident or incident reporting |
| Safety Checklist | Zones-only inspection without header or sign-off sections | Quick safety spot-checks |
| Blank Checklist | Empty template to build from scratch | Custom workflows |
Create a Checklist
To create a new checklist:
- Navigate to the Checklists section in ToolWorks.
- Click the + Add Checklist button.
- Enter a Name for your checklist (e.g., "Daily Pre-Trip DVIR").
- Select a Checklist Type to start with a pre-configured template, or choose Blank Checklist to start from scratch.
- Click Create to open the Checklist Builder.
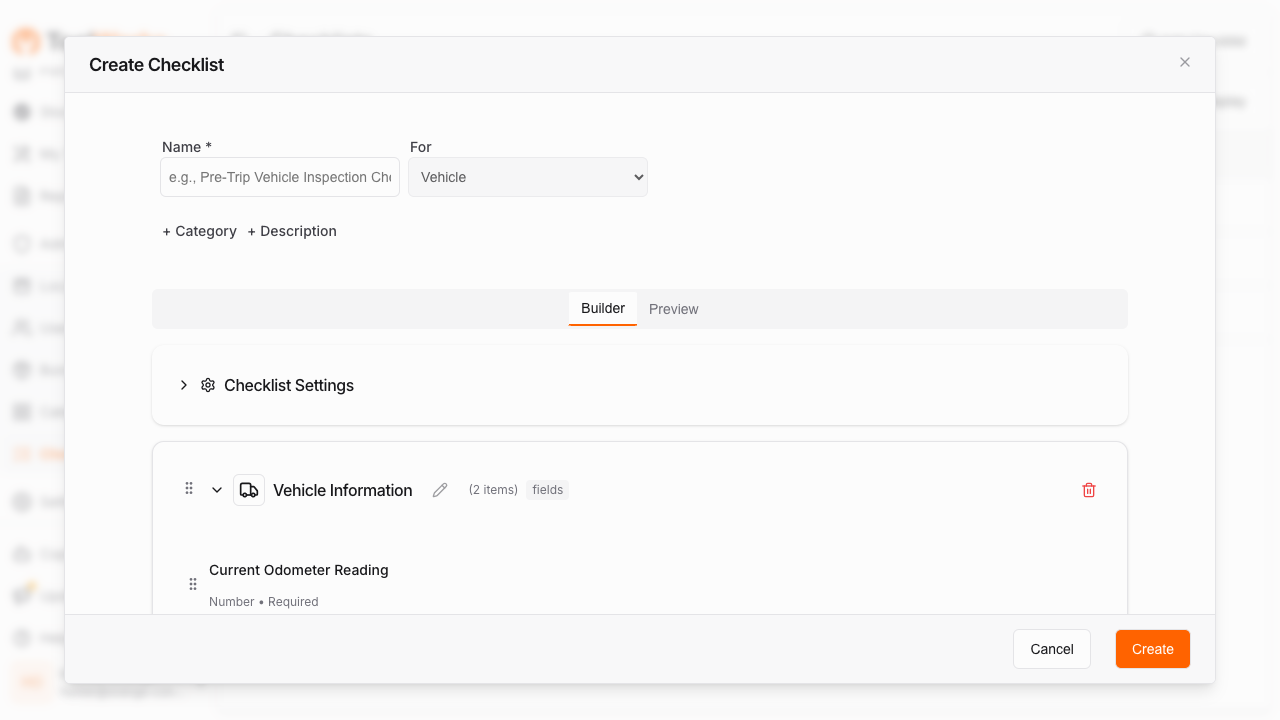
The Checklist Builder
The Checklist Builder is a drag-and-drop interface for designing your inspection workflow. It has two tabs:
- Builder — Edit sections, zones, and items
- Preview — See how the checklist will appear to drivers
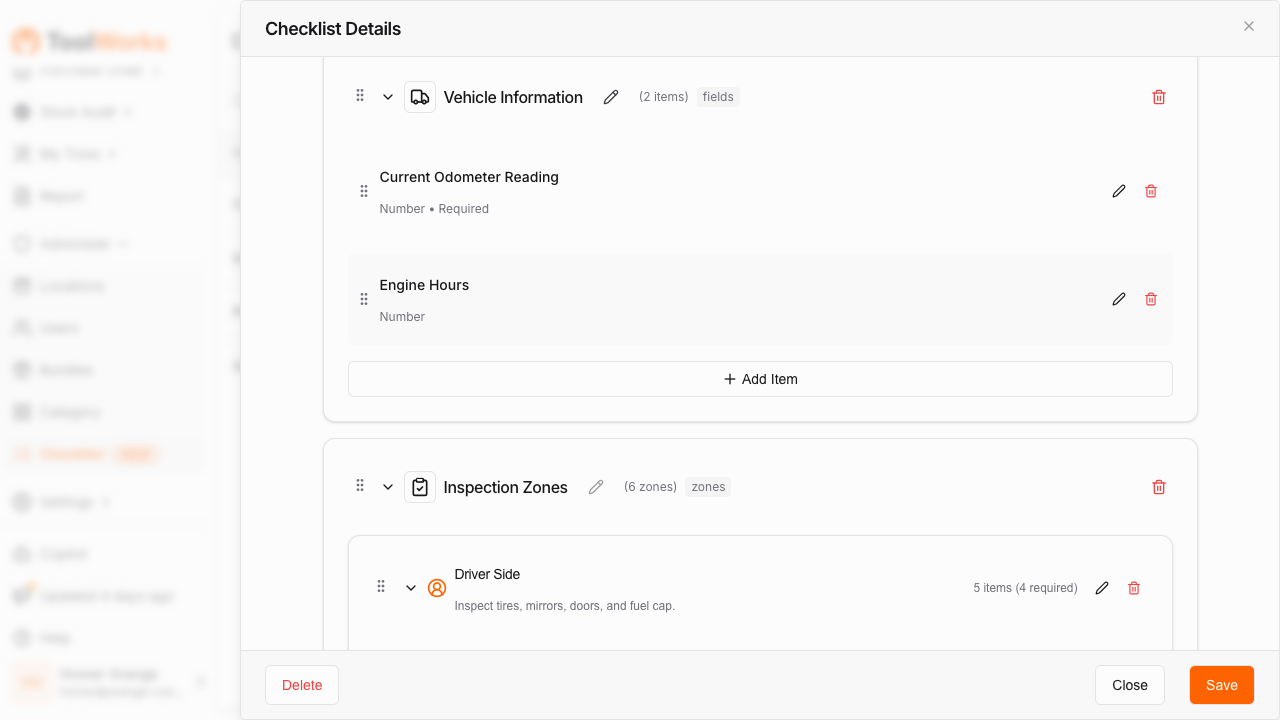
Sections
Sections are the top-level containers in your checklist. Common section types include:
| Section | Purpose |
|---|---|
| Vehicle Information | Capture odometer reading, engine hours, and other header data |
| Inspection Zones | Group pass/fail inspection items by vehicle area |
| Asset Inspection | Verify high-value tools assigned to the vehicle |
| Sign Off | Driver signature and certification declaration |
| Incident Details | Date/time, photos, and notes for incident reporting |
| Custom Fields | Empty section for custom form fields |
To add a section:
- Click + Add Section in the Builder.
- Select the section type from the list.
- Drag sections to reorder as needed.
Zones
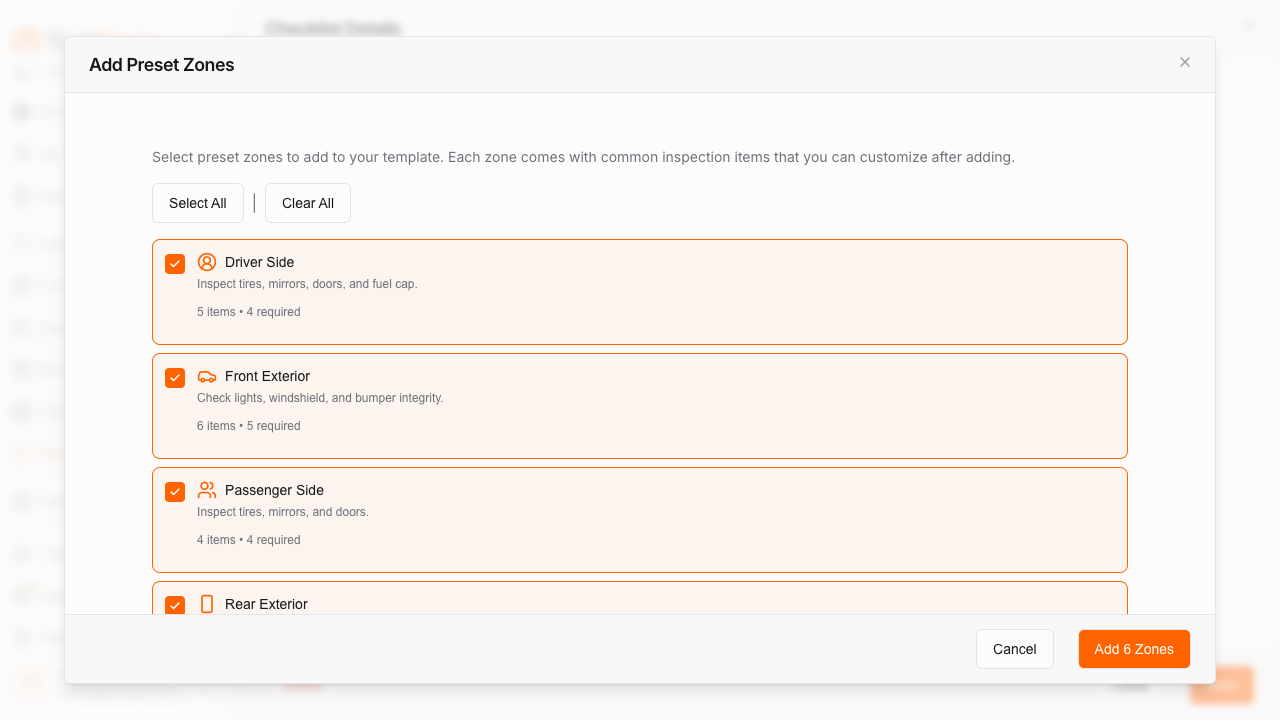
Zones represent physical areas of the vehicle to inspect. ToolWorks includes pre-configured zones you can add with one click:
| Zone | Items Included |
|---|---|
| Driver Side | Front/rear tires, side mirror, door & locks, fuel cap |
| Front Exterior | Headlights, turn signals, windshield, wipers, bumper, hood latch |
| Passenger Side | Front/rear tires, side mirror, door & locks |
| Rear Exterior | Tail lights, brake lights, backup lights, bumper, cargo door, license plate |
| Cab Interior | Service brakes, parking brake, steering, horn, warning lights, seat belt, fire extinguisher |
| Engine Compartment | Oil level, coolant level, belts & hoses, battery, leaks |
To add a zone:
- Click + Add Zone within an Inspection Zones section.
- Select a preset zone or create a custom zone.
- Customize the zone title, icon, and instruction text.
Items
Items are individual inspection points within a zone. Each item has:
- Label — What the driver sees (e.g., "Front Tire")
- Type — The input control type (see Item Types)
- Required — Whether the item must be completed
- Failure Settings — What happens when the item fails
To add an item:
- Click + Add Item within a zone.
- Enter the item label.
- Select the item type.
- Configure failure settings as needed.
Item Types
ToolWorks supports 12 different input types for inspection items:
| Type | Description | Use Case |
|---|---|---|
| Pass/Fail | Simple pass or fail toggle | Basic condition checks |
| Pass/Fail (Detailed) | Pass/fail with predefined failure reasons | Items with common failure modes (e.g., tires: low pressure, low tread, sidewall damage) |
| Number Input | Numeric entry with optional min/max validation | Odometer reading, engine hours |
| Text Input | Free text entry (single or multi-line) | Notes, descriptions |
| Checkbox Declaration | Certification checkbox | "I declare this inspection is accurate" |
| Signature Pad | Digital signature capture | Driver sign-off |
| Date/Time Picker | Date and time selection | Incident time |
| Photo Upload | Photo capture with optional min/max count | Documenting damage or conditions |
| Yes/No Toggle | Boolean toggle with custom labels | "Is the vehicle safe to drive?" |
| Calculated Status | Read-only display of overall inspection status | Summary display |
| Tool Verifier | Verify tool presence (present/missing) | High-value tool verification |
| Select List | Dropdown with comma-separated options | Selecting from predefined choices |
Configure Failure Settings
When an item can fail, you configure what happens on failure:
Severity Levels
- Minor — Issue noted but vehicle can operate (e.g., low washer fluid)
- Major — Critical safety issue that puts vehicle Out of Service (e.g., brake failure, flat tire)
⚠️ Important: When an item is marked as Major severity failure, the vehicle is automatically marked as Out of Service and fleet staff are notified immediately.
Failure Requirements
For each item, you can require:
- Photo Required — Driver must take a photo when marking as failed
- Comment Required — Driver must enter a comment when marking as failed
Failure Reasons (Detailed Pass/Fail)
For Pass/Fail (Detailed) items, you define specific failure reasons:
Code: low_pressure    Label: Low Pressure       Severity: Minor
Code: low_tread       Label: Low Tread Depth    Severity: Minor
Code: sidewall_damage Label: Sidewall Damage    Severity: Major
Code: flat            Label: Flat / Blown Out   Severity: Major
Drivers select from these pre-defined reasons, ensuring consistent failure categorization.
Checklist Settings
Configure global settings for your checklist:
| Setting | Description | Default |
|---|---|---|
| Require GPS | Capture GPS location when inspection is conducted | Enabled |
| Minimum Duration | Minimum seconds the inspection must take to be valid | 120 seconds |
| Allow Skipping Zones | Whether drivers can skip zones (not recommended for compliance) | Disabled |
Access settings by clicking the Settings gear icon in the Checklist Builder.
Assign a Checklist
After creating a checklist, assign it to vehicles so drivers can conduct inspections.
- Navigate to the Checklists section.
- Click on the checklist to open its details.
- Select the Assignments tab.
- Click + Add Assignment.
Assignment Types
| Type | Description |
|---|---|
| All Vehicles | Applies to every vehicle in your fleet |
| By Vehicle Properties | Target vehicles by category, location (store), or catalog |
| Specific Vehicle | Assign to individual vehicles |
Assignment Options
When creating an assignment, configure:
- Is Mandatory — Inspection must be completed before vehicle use
- Validity Duration — How long a completed inspection remains valid (in hours)
- Priority Level — Order in which checklists appear when multiple are assigned
Schedule Inspections
Set up recurring inspection schedules:
-
In the assignment dialog, enable Schedule.
-
Select the Frequency:
- Daily — Every day
- Weekly — Once per week
- Monthly — Once per month
-
For Weekly schedules, select Allowed Days of Week.
-
Set Validity Duration (hours) — how long the inspection remains valid after completion.
Example Schedules
| Scenario | Configuration |
|---|---|
| Daily pre-trip inspection | Frequency: Daily, Validity: 24 hours |
| Weekly safety check | Frequency: Weekly, Days: Monday, Validity: 168 hours |
| Monthly detailed inspection | Frequency: Monthly, Validity: 720 hours |
Notifications
Configure notifications to remind drivers and alert staff:
| Setting | Description |
|---|---|
| Should Notify | Enable/disable notifications for this assignment |
| Notify Before | Days before due date to send reminder |
| Notify At | Time of day to send the notification |
When a Major failure occurs during an inspection, fleet staff are automatically notified via push notification regardless of these settings.
Security & Permissions
Managing checklists requires specific permissions:
| Right | Capability |
|---|---|
| Manage Templates | Create, edit, and delete checklists |
| Settings | Access checklist builder and configuration |
Drivers conducting inspections need:
| Right | Capability |
|---|---|
| Field Inspection | Conduct inspections in the field |
| Manage Inspection | Full access to view, edit, and void inspections |
Next Steps
- Learn how drivers conduct inspections: Inspections
- Set up vehicles for your fleet: Vehicle Management
- Track maintenance based on inspection findings: Maintenance